Overview, Definitions, Navigation, Image Best Practices, User Management
Overview
CollectorproOnline is the premier personal property appraisal report writing tool and is accessible is accessible from any internet connected browser. Here is what you can expect.
- Access your work from any browser.
- Craft customizable USPAP compliant appraisals of all sizes, from simple inventories to complex collections.
- You can upload, add, and edit all cover and addendum documents from within the platform.
- Strong preview function that can provide a quick preview of a single object or the entire report.
This online guide will take you through the steps necessary to begin creating appraisal reports with ease.
User Roles
There are two user roles within CollectorproOnline.
Company Administrators – Have full access to all the features and functions of the platform:
- Invite, Add and Delete Users
- Create and manage Workfiles
- Add Objects, Images, Comparables
- Add/Edit all documents
Appraisers – Can access and use all features and functions within the software except:
- Invite, Add and Delete Users.
Note: For user management functionalities, (e.g. adding users to workfile access) please contact your Company Administrator.
Definitions
Addendum Documents: Documents that will appear after the body of the report (e.g. Bibliography, Curriculum Vitae, etc.).
Categories: One tier of the CollectorproOnline object classification system. Can be used independently or in conjunction with any or all the other tiers. If used with all three it is the second level tier. (Ex. Chapter: 1210 Branch St. Category: Living Room Subcategory: Furniture).
Chapters: One tier of the CollectorproOnline object classification system. Can be used independently or in conjunction with any or all of the other tiers. It is the top-level tier. Implemented as a requirement for the IRS in conjunction with IRS form 8283. It is often used outside of IRS purposes. Under these circumstances, it is often used for workfiles when clients have multiple locations. (Ex. Chapter: 1210 Branch St. Category: Living Room Subcategory: Furniture).
Company: Name and address of the company that made the initial purchase of the CollectorproOnline license.
Cover Documents: Documents that will appear before the body of the report (e.g. Title Page, Transmittal, Certification, Limiting Conditions, etc.).
Field Labels: Tags tell the user what type of information should be entered into the corresponding field (e.g., “Condition”). Note: If a field is not used, no information entered, it will not print on final report.
Field Label Templates: Predefined sets of Field Labels. Each template is comprised of the complete list of data fields that can be used in the workfile. The Default template is based on a modified Getty Object ID template and will cater to various needs. Additionally, we have a User-Defined template that allows for complete User field label customization. Other templates available are Business Inventory, Fine Art, Household Contents, Aircraft, Vehicles/Equipment. Note: Only one template can be used per workfile.
Flex Fields: Four additional fields that are available for each object. These fields are all user defined and are provided for any additional information that needs to be included on the report (e.g. Heirs, Artist Biography, etc.). Note: Flex fields are defined per workfile, not per object.
ID (Object): Required field and must be unique on each object. This is a user defined alpha numeric field that is used to Identify each object within the database. For the report, the Object ID field is used to sort the objects on the report.
Groupings: General term used to describe the three-tiered classification system used by CollectorproOnline to produce the Summary Totals pages in each report. It can include any combination of Chapters, Categories, and Subcategories (see section Object Groupings: Chapters, Categories, and Subcategories). They help you organize your objects. They are not required, but they provide the information for the Summary Totals.
Objects: The items you’re valuing, which can be single items, sets (like a jewelry collection), or groups (like furniture in a room).
Object Images: Digital photos of the items you’re appraising. A limit of 6 (six) images per object. (See images – best practices)
Object Comparables: Similar items used to support the value assigned to your object. Each object can have multiple (unlimited) comparables. You choose which ones to print on the final report. Ones that are not printed will still be stored in the workfile for your information. Each comparable is allowed 1 (one) image.
Subcategory: One tier of the CollectorproOnline object classification system. Can be used independently or in conjunction with any or all the other tiers. If used with all three it is the third level tier (Ex. Chapter: 1210 Branch St. Category: Living Room Subcategory: Furniture).
Summary Totals: These pages mark the beginning of the body of the report that is compiled by the object information you enter into CollectorproOnline. They are a snapshot of the object (grouping name and value only). These documents provide a summarized total for objects based on the Chapter, Category and Subcategory; you the appraiser have assigned to each object. (see section on Object Groupings: Chapters, Categories, and Subcategories).
Users: Anyone with access to CollectorproOnline, either as a Company Administrator (managing other users and projects) or an Appraiser (creating and editing reports). See the “User Roles” section for more details.
Valuation Type: The type of Valuation(s) provided in a workfile (e.g. Fair Market Value). CollectorproOnline allows for up to 5 (total) valuation types per object. The Primary Valuation type will always appear first. Each of the Valuation fields is User defined. The Valuation Type field is not required and will allow the user to create inventory reports without values.
Workfile: Your “digital file”, contained in CollectorproOnline, A Workfile contains the USPAP, Client, Object, Comparable, and Cover and Addendum Documents and will make up your completed report.
Workfile ID: A user defined alpha-numeric field for you to identify your workfile. They must be unique. (Ex. J Smith Estate 4 21 2023). Note: Special characters like commas, dashes, or slashes are not supported in the workfile ID Field.
Navigation
The importance of navigation goes beyond simply finding your way around. It’s crucial for optimizing your workflow, ensuring accuracy, and saving time. Effective navigation allows you to quickly move between different sections, find specific appraisals or objects, and access relevant information. By taking advantage of the navigation tools and learning to use them effectively, you can optimize your workflow, minimize errors, and maximize the value you get from CollectorproOnline.
General Screen Navigation
The best way to navigate through the fields is to use the tab key or move the mouse and click within the selected field. Pressing the “Enter” key does not complete that function, it simply moves the cursor to the next line in that field. To move to the next field, you can use the tab key or move your cursor to the field you wish to use and click.
To navigate to a new tab (Client Info, Additional Info, etc.) simply move your cursor to the tab and click.
You can search for Workfiles by using the search function. It can be found in the middle top of the Workfile Listing Screen. You can Search for an appraisal by the Primary Appraiser assigned or a keyword within the ID.
Left Navigation Pane
A feature that allows the user to quickly navigate and access different areas of a workfile.
• Appraisal Level
• Object Level
Images Best Practices
JPEG and PNG image formats are supported.
IMPORTANT – iPhone and iPad HEIC format images are NOT supported. If you use one of these devices to take object and comparable images be sure to set your camera settings to Compatible format before taking the images.
Images look best on the report if they are all the same, or near same dimensions (W X H).
Image upload size is 2.5mb maximum. Consider taking the images using camera settings that will accommodate this size or resize the images before attaching to objects and comparables. There are many free bulk resizing tools available.
Portrait and Landscape image orientation is supported. CollectorproOnline will do it’s best to center the images on the report
Administration
Administration Overview
The Administration function in CollectoproOnline is available to users assigned the role Company Administrator.
Users with this role can:
- Invite, Activate, Deactivate, and Edit Users
Assign and Delete permissions of specific Users from workfiles
Administration Details
User Administration
CollectorproOnline allows a company Administrator to invite, reactivate, deactivate, and edit users as needed.
Inviting New Users
CollectorproOnline allows A company Administrator to invite, reactivate, deactivate, and edit users as needed.
- Click on Administration on the navigation bar
- Click on Users
- Click the Invite User button in the upper right corner
- Enter the users first and last name and email address and click the Send button. If you change your mind before clicking the send button, simply click the Cancel button
The new user receives an email with a link to either accept or reject the invite. If the user accepts the invite, they are redirected to the CollectorproOnline registration page and you are sent an email to confirm that the new user has accepted your invitation. They will need to complete the registration form by entering their name, email, and telephone, etc. When complete, their username and password are created and they will have access to CollectorproOnline. Additionally, CollectorproOnline support staff is notified, and the new user is contacted, along with the Company Admin, to schedule training.
If the new user rejects the invitation, you are sent an email notification that the invite has been rejected. You may want to reach out to the new user personally to confirm their choice. If a rejection was made by accident and you need to reinvite them, you will need to reach out to the CollectorproOnline support staff using this contact form so they can reset the invite information.
Edit Users
A Company Administrator may edit any user in their company.
Edit user’s information:
- Click on Administration
- Click on Users
- Locate the user you want to edit on the list
- Click on the three-dot menu () located at the end of the user’s line
- A drop-down menu will appear, select “Edit”
- The User Information screen will appear as a section located on the right of the screen. Make the necessary changes to the user information. Note: Fields with a red asterisk are mandatory. The save button will activate when changes have been made. If no changes are made only the Cancel button will be activated.
- Click the Save button at the bottom.
Deactivating/Reactivating Users
- Click on Administration
- Click on Users– user list will be displayed on the screen
- Locate the user you wish to activate or deactivate on the list
- Click on the three-dot menu () located at the end of the user’s line
- A drop-down menu will appear, simply click on the word “Activate” or “Deactivate” depending on which action is available. The option that displays will be the opposite of the current status of the user (the target status). Note – an inactive user will have the word “Inactive” appear in red under “Status” on the “User” list. An active user will have the word “Active” appear in green under “Status” on the User list.
- The status change is effective immediately.
Click her to see a video on activating and deactivating users
Assigning/Deleting Users from Workfiles
As a Company Administrator, you can manage user access to workfiles. This includes:
Assigning Specific Users: Grant access to specific workfiles for individual users. You can also assign multiple users to a single workfile.
Managing User Access: Remove users from workfiles they no longer need access to.
Note: Company Administrators have full access to view and manage all workfiles in the system. Users can only see and access the workfiles they’ve been assigned to or have created themselves (See Create a Workfile section).
Assigning/Deleting Users to Existing Workfile
- Click on the desired workfile from the workfile listing.
- In the left column, click in the field “User Assigned” field
- A drop-down menu will appear.
- To add new user(s): select the checkbox next to the name of the User(s) you want to grant access
- To remove a user(s): uncheck the checkbox next to the user’s name
Assigning Users to New Workfiles
- From the Home Page Check Create New Workfile.
- Fiil out all relevant information.
- When you reach the “User Assigned” field, click on it.
- From the drop-down menu, click on the checkbox (s) next to the users you want to grant access to the workfile.
Note: When a user creates a new workfile, they automatically have access to it. Only the creating user and Company Administrators have access unless modified by a Company Administrator.
Working with CollectorproOnline: Screens, Fields
Workfile Listing Screen
Workfile Listing Screen Overview
The Workfile Listing Screen is the first screen you see when you log in to CollectorproOnline. It serves as your central hub for managing all your appraisal reports (workfiles). From here, you can create new workfiles, view existing ones, generate reports, and perform other actions.
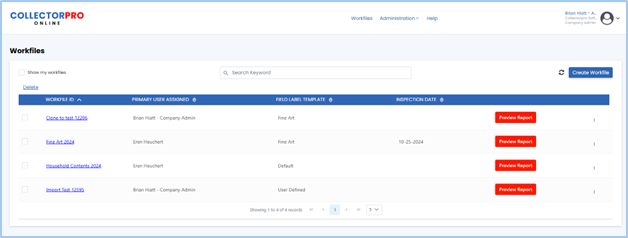
Workfile Listing Screen Header
Show My Workfiles Checkbox – This checkbox allows you to filter and display on workfiles where you are the primary appraiser assigned.
Search Keyword– Enter a Workfile ID or keyword to filter the list.
![]() – Clicking this will refresh the webpage.
– Clicking this will refresh the webpage.
Create Workfile – Click this button to create a new workfile.
Workfile List Header – The blue bar that contains:
- Sortable Section Headings
- Select All Check Box
This Workfile List Header allows you to sort your workfiles in many ways. The active sort is indicated by a single arrow to the right of the heading that is being sorted. The default sort is Alpha/numeric by Workfile ID (as indicated by the single arrow next to Workfile ID heading).
You change the order in which workfiles are sorted by clicking the single arrow. Arrow pointing up the sort is in ascending order (1,2,3,a,b,c), arrow pointing down sort is in descending order (3,2,1,c,b,a).
You can sort by any of the headings by simply clicking on the double arrows next to the heading name. You will know which heading is the active sort because it will have a single arrow.
You can also delete selected workfile(s) by clicking on the individual check box next to a single workfile.
If a workfile(s) is selected, the Delete function will become active and allow the user to delete workfiles.
Workfile Listing Screen Line Items
Each new workfile created will be automatically added to the listing on this screen. Several functions can be performed from this row:
- View/Edit the workfile
- Create/View report
- Export to Excel
- Clone Workfile
- Delete Workfile
Workfile ID – The Workfile ID is a unique ID assigned when the workfile is created. Clicking the workfile ID opens the workfile for viewing and editing
View/Edit Workfile – View or edit the workfile by clicking on the blue, underlined Workfile ID at the beginning of the row. Additionally, you can also edit a workfile by clicking on the Kabob menu (three dots) at the end of the row and selecting “Edit”.
Preview Report – Create and view the report by clicking on the red Preview Report button at the end of the row.
Export Objects– Export the object in the workfile to an Excel Spreadsheet by clicking on the Kabob Menu (three dots) at the end of the row and selecting “Export Objects”.
Clone Workfile – Clone a workfile by clicking on the Kabob menu (three dots) at the end of the row and selecting “Clone Workfile”. See Section “Clone a Workfile Overview” for details.
Delete Workfile – Delete a workfile by clicking the check box to the left of the workfile you wish to delete and then click the “Delete” button above the Workfile List Ribbon or by clicking on the Kabob menu (three dots) at the end of the row and select delete.
Workfile Listing Screen Footer
Located at the bottom of the page, you’ll find a navigation toolbar to assist you in browsing through extensive lists. This toolbar provides several functions:
- Move between pages
- Adjust the number of rows per page
![]()
Move between pages:
Previous/Next buttons: These buttons allow you to navigate forward or backward through the list, one page at a time.
First/Last buttons: These buttons jump directly to the first or last page of the list, respectively.
Adjust the number of records per page:
Click on the box with the number five (default setting) a drop-down menu will appear. You can then click on the number of records you wish to have displayed on each page. Selecting a higher number will show more items at once, while a lower number will display fewer items with a clearer view of each entry.
Clone a Workfile Overview
CollectoproOnline makes it easy to clone an existing workfile. This feature streamlines the process of duplicating workfiles, allowing you to revalue objects or create alternative report types for your client quickly and efficiently.
Clone a Workfile Details
To clone a workfile:
Navigate to the Workfile Listing Screen and find the workfile you want to duplicate.
Click the kabob menu (three dots) at the end of the row for the selected workfile..
From the drop-down menu select “Clone Workfile

A pop out will appear in the middle of the screen
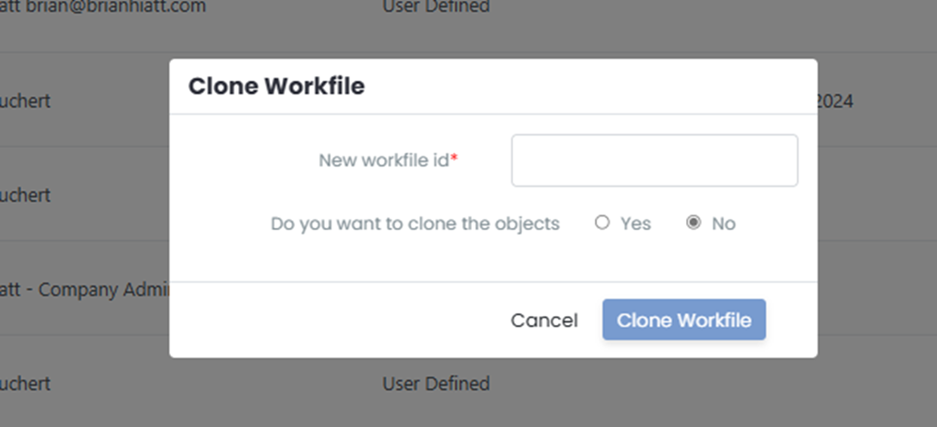
Enter a new Workfile ID
Decide whether to clone the objects by selecting “Yes” or leaving it as “No” (default).
If you select “Yes,” another option will appear to decide whether to clone the comparables.
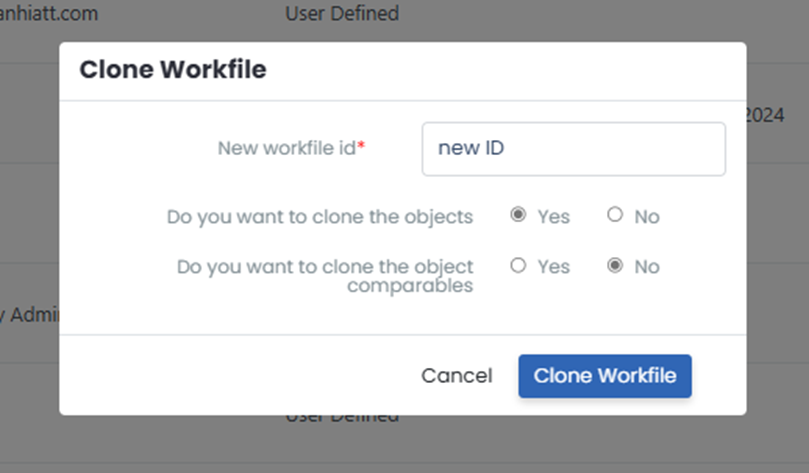
Click the blue “Clone Workfile” button to begin the cloning process.
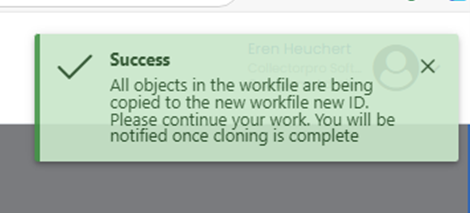
A green “Success” notification will appear in the upper-right corner, confirming that the cloning process has started. Note: Larger workfiles may take a few minutes to clone. The system runs this process in the background, allowing you to continue.
Once the cloning is finished, a notification will appear in the center of the screen confirming that the new workfile is ready to view.
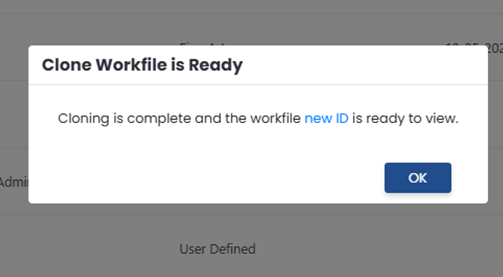
Note: Cloning copies all aspects of the source workfile including client information, cover and addendum documents, images for objects and comparables (if applicable). This ensures the new workfile mirrors the original, allowing for seamless modifications or report generation.
Workfile Info Screen
Workfile Info Screen Overview
The Workfile Info Screen allows you to input all relevant details associated with a specific workfile such as start and effective date, categories assigned, valuation types, etc.
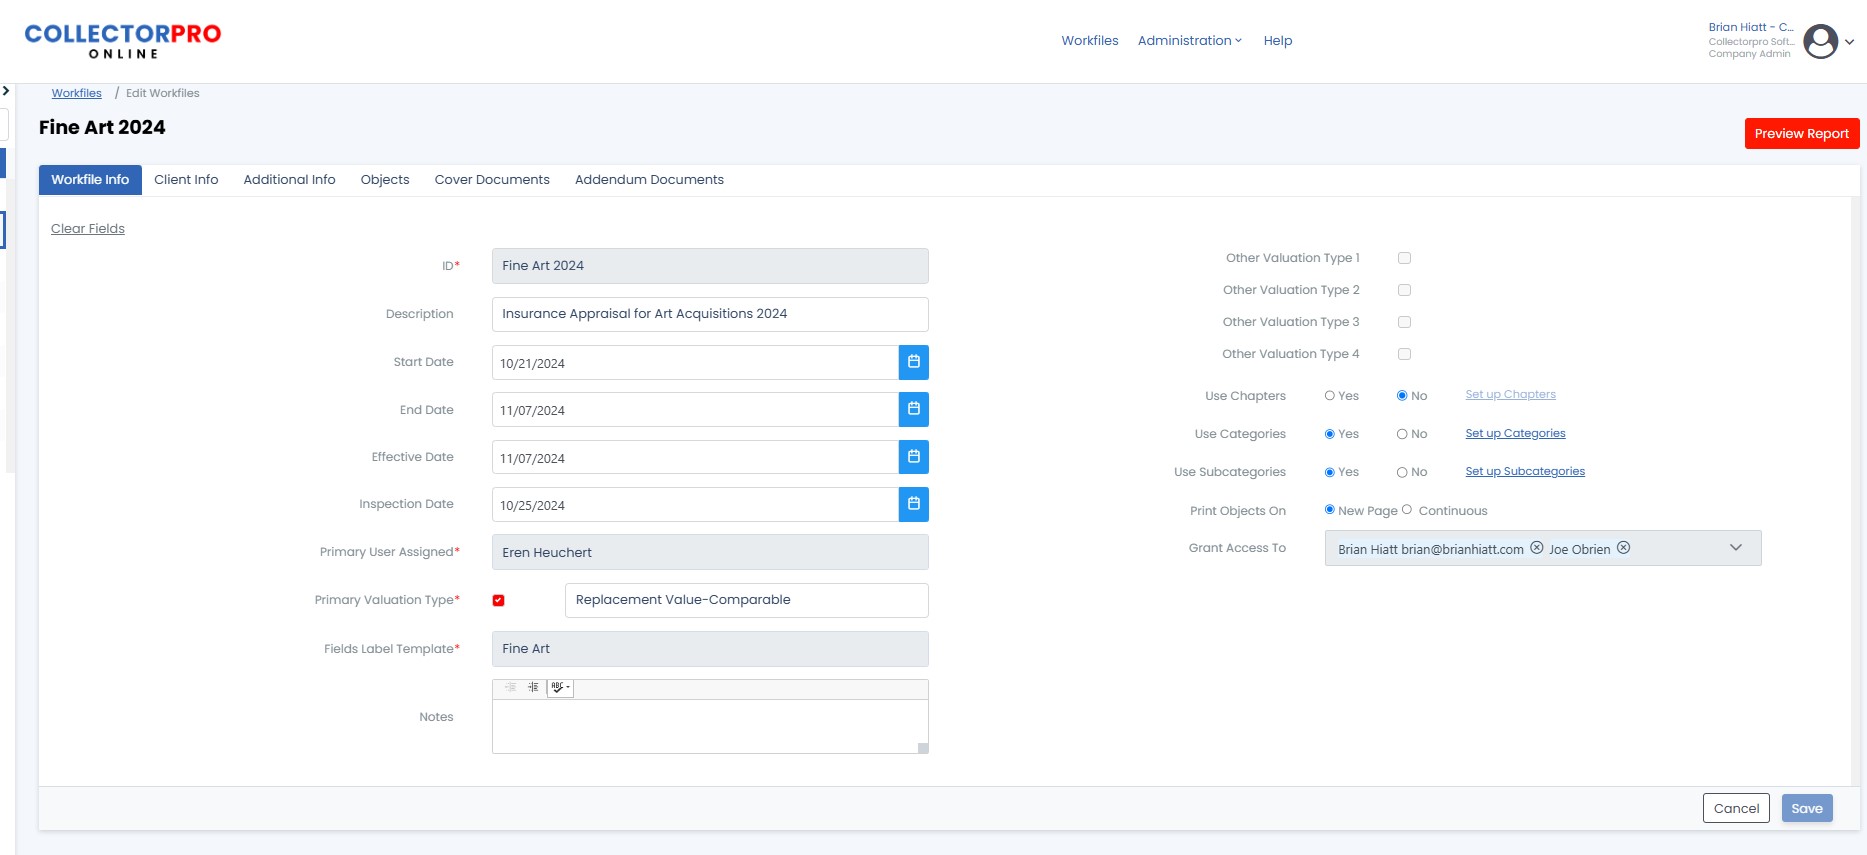
Workfile Info Screen Details
A workfile that contain the objects that are being appraised along with comparables.
WorkfileScreen Details
Workfile List – On the left side of the workfile screen is a list of all appraisals. You may click on the workfile ID to open another appraisal. You can collapse the workfile list by clicking the arrow pointing left near the top. You can also search for a workfile by typing the search term in the Search by workfile ID field.
ID Field– This is the appraisal ID you assign to the workfile. It must be a unique ID containing only alphanumeric values
Description – Short description of the workfile.
Start Date – Enter or select the start date of the workfile.
End Date – Enter or select the end date of the workfile.
Start Date – Enter or select the effective date of the workfile.
Inspection Date – Enter or select the inspection date of the workfile.
Primary Appraiser Assigned – Select the primary appraiser assigned to this workfile. This is usually the appraiser that will be signing the appraisal report.
Primary Valuation Type – Check the box to use this valuation and type in the valuation type, Ie. Fair Market Value.
Other Valuation Types 1 – 4 – You may assign up to 5 valuations to each object. Click the checkbox next to the one you wish to use and enter the valuation type.
Field Labels Template – CollectorproOnline has several predefined field label types. Selecting the field label type will adjust the object field labels. See Field Label Template for more details. Select User Defined to set the object field labels to your own custom values. Field labels apply to every object in the appraisal. If you select User Defined, you can set the field labels on the Add Object screen using the Edit Field Labels link when adding the first object. This only needs to be done once to apply to all objects.
Notes – Enter any notes about the workfile. These are private and do not show on the appraisal report.
Addendum – Click the browse button to upload a Word document containing your appraisal report addendums. This document will be appended to the end of the report.
Cover – Click the browse button to upload a Word document containing your appraisal cover document. This document will be appended to the beginning of the report.
Use Chapters – Select Yes to assign Chapters on the objects on this report. Chapters are setup in the Administration area.
Use Categories – Select Yes to assign Categories on the objects on this report. Categories are setup in the Administration area.
Use SubCategories – Select Yes to assign SubCategories on the objects on this report. SubCategories are setup in the Administration area.
Note :Chapters, Categories, and Subcategories, if used, will create a report section with summary totals for each.
ID Assignment Method – Choose automatic or manual ID assignment. Default is automatic ID assignment. See the Object ID Assignment help for more information.
Grant Access To – Choose which users in your company can see this workfile in the workfile list and view/edit the workfile and objects/comparables.
Workfile List Heading Checkbox – Checking this box will select all appraisals in the current list and present an option to delete the selected appraisals. This is useful to delete multiple appraisals at the same time.
Create workfile Button – Use this button to start a new workfile.
Preview Report Button – Use this button to create and download the report to a Word document format. See the Report topic for more information.
Save Button – Click this button to save the appraisal information and return to the appraisal list.
Objects Tab – Click this tab to add, edit, or delete objects on the active workfile. See the Objects topic for more information.
Notes:
A red asterisk next to the field label indicates required fields.
Field Label Template Overview
Field Labels define the type of information entered into each text field on the Object Info 1 and Object Info 2 screens. CollectorproOnline provides several predefined Field Label templates tailored to various specialties, such as Fine Art, Household Contents, and Business Inventory, to streamline data entry and save time.
We also have a User-Defined Template. The User-Defined Template offers complete flexibility, allowing you to assign custom labels to each text box. With this feature, you can specify the purpose or type of information for each field to suit your unique needs (e.g., Provenance, Condition Notes, Appraiser Comments). This feature gives you the ability to tailor fields for specific workflows or reporting requirements, ensuring the information is organized exactly as you need it.
Field Label Template Details
To assign a Field Label Template to a workfile:
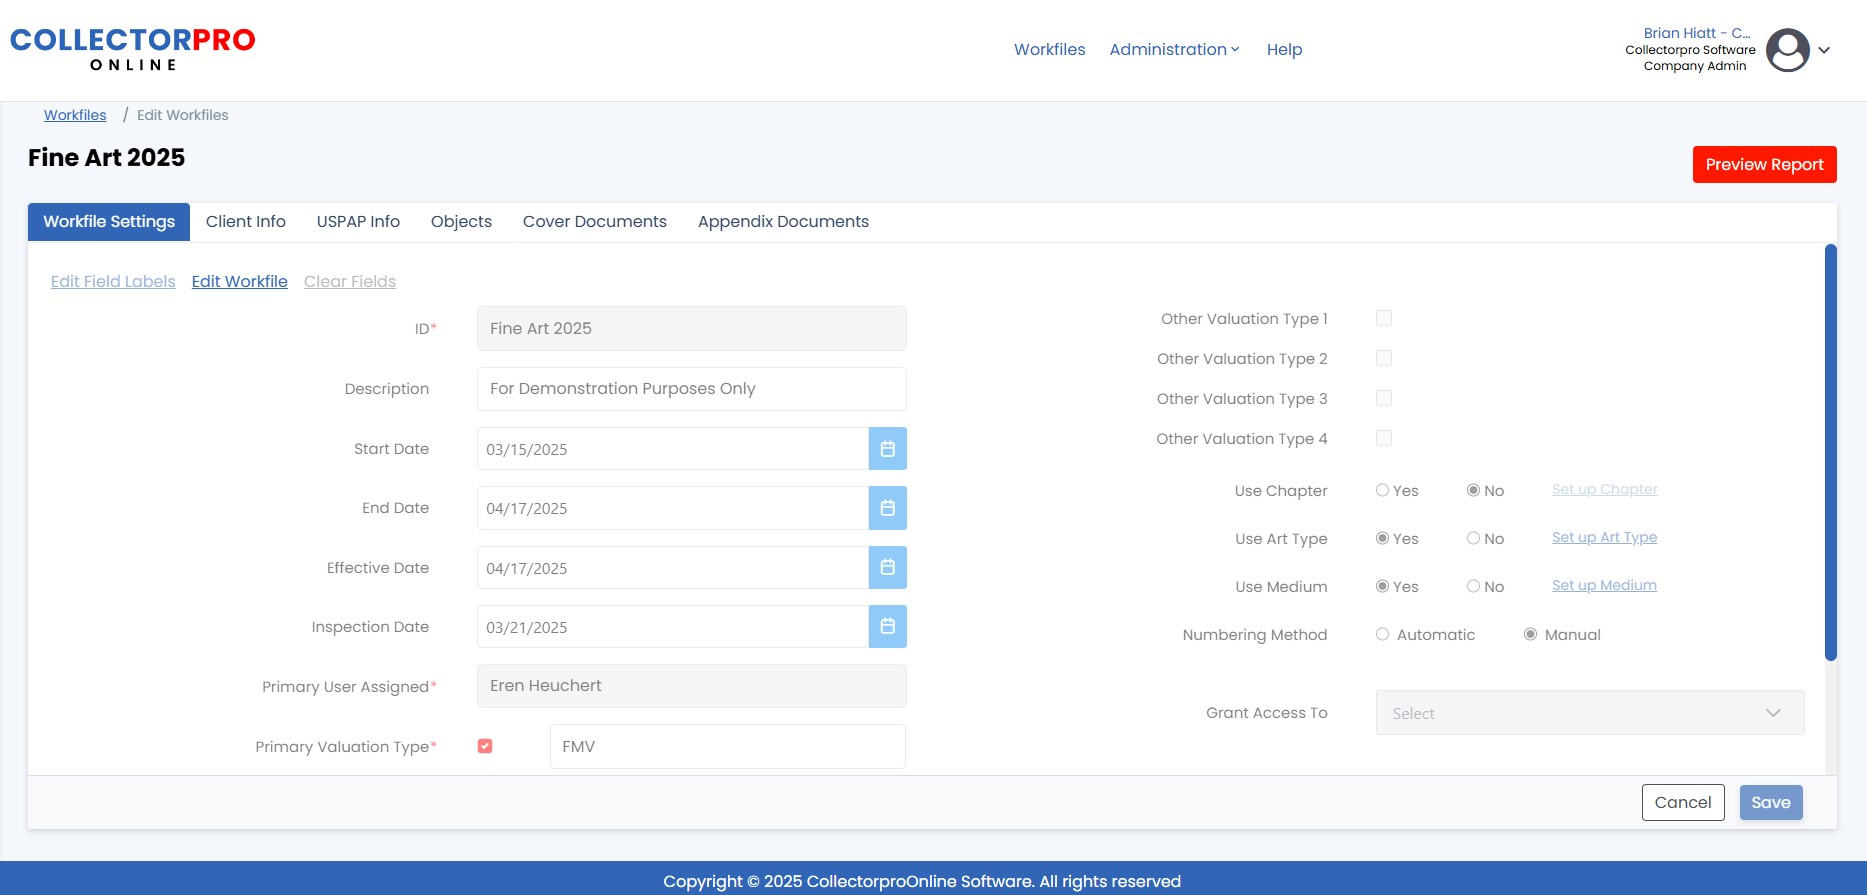
On the Workfile Info screen, click in the text box next to Field Label Template.
A dropdown menu will appear. Select the desired template for the workfile.
Note: The selected Field Label Template applies to the entire workfile and will be used for every object within it.
User-Defined Field Label Template Details
To set up a User-Defined Field Label Template:
- Select the User-Defined Template:
- On the Workfile Info screen, choose User-Defined Template from the dropdown menu next to Field Label Template.
- Navigate to the Object Tab:
- Click on the Object Tab, then click Add Object to create a new object.
Assign an Object ID to the object.

- Edit Field Labels:
- Click the Edit Field Label link in the top-left corner of the screen.
- A pop-out window will appear on the right, displaying all available fields.
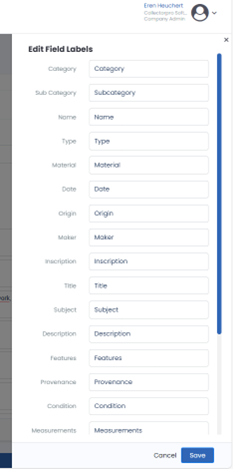
- Customize Field Labels:
- The fields will auto-populate with the default template labels.
- Enter your desired label names into the text boxes provided.
- Use the blue scroll bar on the right of the pop-out window to navigate through the full list of fields.
- Save Changes:
- Once all labels are customized, click Save to apply your changes.
- The updated labels will be immediately visible on the object and will be consistent across all objects in the workfile.
Flex Fields Overview
Flex Fields are customizable fields included in every Field Label Template. These four fields allow users to add up to four additional custom fields to any template, providing flexibility to tailor the template to specific needs.
Note: Flex Fields function like all other fields: they are optional. If no data is entered into these fields, they will not appear in the report.
Flex Field Details
To set up Flex Fields
Click on the Edit Field Labels link on the top left of any object screen.
A pop-out window will appear on the right, displaying all available fields.

Customize Field Labels:
The fields will auto-populate with the default template labels.
Enter your desired label names into the text boxes provided.
Save Changes:
Once all labels are customized, click Save to apply your changes.
The updated labels will be immediately visible on the object and will be consistent across all objects in the workfile.
Groupings Overview
Groupings are a three-tiered classification system in CollectorproOnline, used to create the Summary Totals pages in reports. They help you and your clients identify, classify, and organize objects. While not required, Groupings can be applied in any combination of Chapters (top tier), Categories (mid-tier), and Subcategories (bottom tier). The classifications you assign populate the Summary Totals section of the report. If you choose not to use Groupings, the Summary Totals section will be omitted from the report.
NOTE: Groupings are assigned at the workfile level, meaning they must be added separately for each workfile. To simplify future setup, you can create a template workfile with predefined Groupings. You can then clone the template workfile for consistent use.
Flexibility of Groupings
Groupings allow you to structure your objects however you see fit. For example, you might choose:
- Chapter: Location
- Category: Room
- Subcategory: Object Type
Or, if you prefer, you can set it up with just two tiers:
- Chapter: Room
- Category: Object Type
You are fully in control of how you categorize and classify objects.
Note: For more detailed information about how the Summary Totals section works based on the groupings you create, please refer to the Summary Totals section of this help file.
Examples of Groupings
Here are two examples of how you can use Groupings to organize your objects:
Example 1 (Three Tiers): This structure allows you to assign objects to specific locations, rooms, and types.
- Chapter: Aspen Home, NYC Apt., Storage Unit 1
- Category: Living Room, Dining Room, Kitchen
- Subcategory: Furniture, Art, Decorative Accessories
Example 2 (Two Tiers): This example, objects are classified by the room they are in and the type of object.
- Chapter: Living Room, Dining Room, Kitchen, Bedroom 1
- Category: Furniture, Fine Art, Decorative Accessories, Lighting
Note: The Summary Totals section will automatically generate based on the Groupings you assign. It will display a summary of your classified objects, breaking down counts and values by Chapters, Categories, and Subcategories as you’ve defined. You can view this section at the beginning of your report to quickly see an overview of the values for each grouping you’ve created.
Groupings Details
When creating a new workfile, you will be directed to the Workfile Info screen. The Groupings section is located on the right-hand side, and all three tiers (Chapters, Categories, Subcategories) default to No.
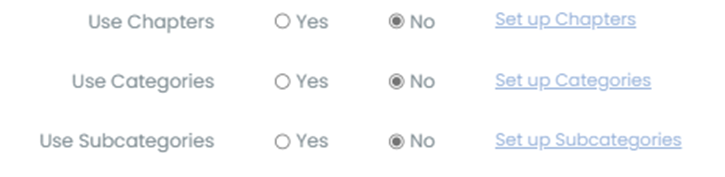
To enable Groupings:
Click the radio button next to Yes for any combination of tiers you wish to use.
Once selected, a link to configure the Groupings will become active.
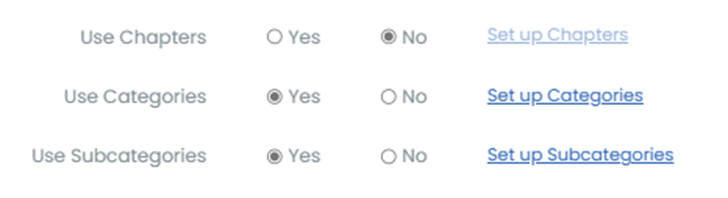
To configure Groupings:
Click the active link to open a pop-out screen on the right-hand side.
In the pop-out screen, click the blue button labeled Add Chapter, Add Category, or Add Subcategory.
A blank text box will appear. Enter the desired classification name (e.g., Lighting, Paintings) and click the green check mark to save.
Repeat this process for each classification you wish to add.

To close the pop-out screen, click the black “X” in the top right corner. This will return you to the Workfile Info screen.
Client Info Screen
Client Info Screen Overview
The Client Info Screen allows you to enter and manage client details for the workfile. The functionalities of the Workfile List, Workfiles Shortcut, Workfile Identification, Preview Report Button, Clear Field Shortcut, Cancel Button, and Save Button remain the same as in the Workfile Info Screen (refer to previous section for details).
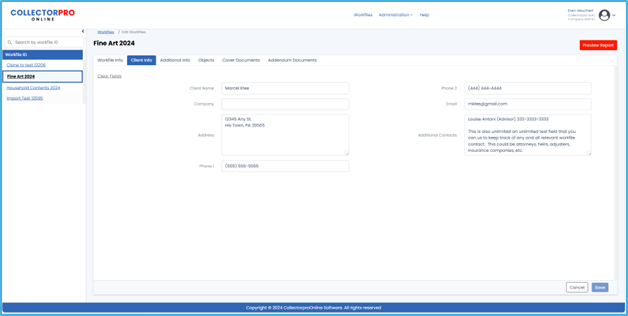
Client Info Screen Details
Clear Field Shortcut – This serves as a quick way to clear all the information contained within the fields.
Client Name – Enter the client’s name.
Company – Enter the client’s company name, if any.
Address – Enter the client’s address.
Phone Numbers– Enter the client’s primary and secondary phone numbers.
Email – Enter the client’s email address.
Additional Contacts – An unlimited text field that will allow you to enter any additional contacts and their contact information. (e.g. Attorney, Heirs, Insurance Company, etc.).
Cancel Button – Click this button to cancel all entered data and return the user to the Workfile Listing Screen.
Save Button – Click this button to save all entered data and return the user to the Workfile Listing Screen.
Note: A user can choose to save the all data from here or they can continue to click through the other tabs (Client Info, Objects, etc.) and save once all data entry is completed. If a user tries to navigate away from the workfile without saving, CollectorproOnline will prompt a Save or Cancel message to protect all data.
Additional Info Screen Details
Clear Fields Shortcut – This serves as a quick way to clear all the information contained within the fields.
Appraisal Use – A user defined field where the appraisal use is entered.
Type of Property – A user defined field where the type of property is entered.
Name of Property – A user defined field where the name of the property is entered.
Address of Property – A user defined field where the address of the property(s) is entered. This is an unlimited text field to accommodate multiple addresses.
Appraisal Purpose – A user defined field where the purpose of the appraisal is entered.
Intended Use – A user defined field where the intended use of the appraisal report is entered.
Premise of Value – A user defined field where the premise of value is entered.
Notes – A user defined field where any additional notes are entered. This is an unlimited text field.
Cancel Button – Click this button to cancel all entered data and return the user to the Workfile Listing Screen.
Save Button – Click this button to save all entered data and return the user to the Workfile Listing Screen.
Note: A user can choose to save the all data from here or they can continue to click through the other tabs (Client Info, Objects, etc.) and save once all data entry is completed. If a user tries to navigate away from the workfile without saving, CollectorproOnline will prompt a Save or Cancel message to protect all data.
Objects
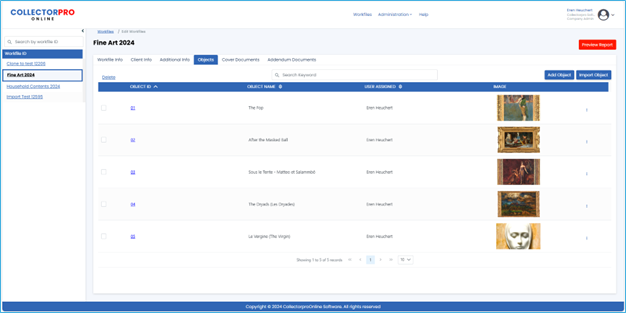
Object Listing Screen Overview
The Object Listing Screen serves as the central hub for managing objects within a workfile. It displays a list of all objects you’ve added and provides options for adding, editing, deleting, and sorting them. The functionalities of the Workfile List, Workfiles Shortcut, Workfile Identification, and Preview Report Button remain the same (refer to previous sections for details).
Object Listing Screen Header
Delete – Is inactive until a workfile is selected by using the check box to the left of the Object ID.
Search – Here you can search for any object by Object ID or keyword.
Add Object Button – Clicking this button will open a new Object Detail Screen to allow adding a new object to the workfile
Please see section on Importing and exporting Objects.)
Object Listing Screen Ribbon
The blue bar that contains:
- Sortable Section Headings
- Select All Check Box

This ribbon allows you to sort your objects in many ways. The active sort is indicated by a single arrow to the right of the heading that is being sorted. The default sort is Alpha/numeric by Object ID (as indicated by the single arrow next to Object ID heading).
You change the order in which objects are sorted by clicking the single arrow. Arrow pointing up the sort is in ascending order (1,2,3,a,b,c), arrow pointing down sort is in descending order (3,2,1,c,b,a).
You can sort by any of the headings by simply clicking on the double arrows next to the heading name. You will know which heading is the active sort because it will have a single arrow.
The select all check box will select all of the objects contained in the platform and allow you to delete them all at once by clicking on the now active “Delete” function.
Objects can also be deleted by clicking on the individual check box next to a single object. If an object is selected, the Delete function will become active and allow the user to delete the selected object(s).
Each new object created will be automatically added to the listing on this screen. Each object will display with:
- Object ID
- Object Name
- User Assigned
- Primary Image Thumbnail
- Clone an Object
Object ID – The unique Identifier that is assigned to an object. You can edit or view the object details by clicking on the blue, underlined Object ID at the beginning of the row. Additionally, you can also edit an object by clicking on the Kabob menu (three dots) at the end of the row and selecting “Edit”.
Object Name – The name given to the object on the object detail screen.
User Assigned – The name of the user that has been assigned to the object by the company administrator. It will default to the primary user assigned. Any user assigned to a workfile may assign other approved users to an object.
Primary Image Thumbnail – The first or primary image assigned to an object.
Kabob Menu – The three dots located at the end of the row. Clicking this menu allows you to preview, clone, edit (open the Object Detail Screen) or delete the object.
Object Listing Screen Footer
Located at the bottom of the page, you’ll find a navigation toolbar to assist you in browsing through extensive lists. This toolbar provides several functions:
- Move between pages
- Adjust the number of rows per page
![]()
Move between pages
Previous/Next buttons: These buttons allow you to navigate forward or backward through the list, one page at a time.
First/Last buttons: These buttons jump directly to the first or last page of the list, respectively.
Adjust the number of records per page – Click on the box with the number five (default setting) a drop-down menu will appear. You can then click on the number of records you wish to have displayed on each page. Selecting a higher number will show more items at once, while a lower number will display fewer items with a clearer view of each entry.
Clone an Object Overview
CollectoproOnline makes it easy to clone an existing object within the same workfile. This time-saving feature allows you to quickly duplicate objects, enabling you to add an unlimited number of items with just a few clicks.
Clone an Object Detail
To clone an object:
Open the Object Listing Screen
Navigate to the specific object you wish to duplicate.
Click on the kabob menu (three dots) at the end of the selected object’s row.
From the drop-down menu, click “Clone.”

A pop-out screen will appear in the center of the screen
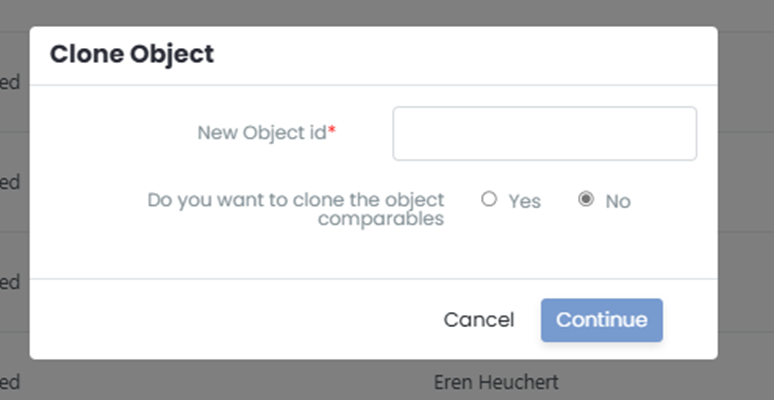
Enter a new Object ID
Use the radio button to decide if you want to clone all associated comparables (if applicable).
Click the blue “Continue” button to complete the process.
A green “Success” notification will appear in the upper-right corner, confirming that the object was cloned successfully.

Repeat the above steps as needed.
Object Detail Screen Overview
When you click on the Add Object button or click an object ID to edit an object the Object Detail Screen open. The Object Detail Screen is actually a series of four screens that will contain all of the relevant data the users enters for each object. Note: A user does not have to use all fields found on these screens. Any field that is left blank will not print on the finished report nor will it leave any blank spaces or lines. The screens are:
- Object Info 1
- Object Info 2
- Images
- Comparable
Object ID's and Automatic ID or Manual ID Assignment
Each object in CollectorproOnline is required to have an ID. The ID is what is used to sort objects on the object listing screen and the reports.
Sorting
The Object ID field is an alphanumeric field and the objects will be sorted by this field. Since the field is alphanumeric the sorting works like a dictionary, Ie. left to right.
If you wish to use only numbers in the object id field and have the objects in the order by number you must use the same number of digits on each object such as 01,02,03,04,05,06,07,08,09,10,11. ‘
Examples:
For a workfile with 1-9 objects use:
1,2,3,4,5,6,7,8,9
For a workfile with 10-99 objects use:
01,02,03,04,05,06,07,08,09,10,11,12……….99
For a workfile with 100-999 objects use:
001,002,003,004,005,006,007,008,009,010,011,012……….999
For a workfile with 1000-9999 objects use:
0001,0002,0003,0004,0005,0006,0007,0008,0009,0010,0011,0012……….99999
The concept above also applies if you are using alphanumeric object ID’s.
Examples:
For a workfile with 1-9 objects use:
A1,A2,A3,A4,A5,A6,A7,A8,A9
For a workfile with 10-99 objects use:
A01,A02,A03,A04,A05,A06,A07,A08,A09,A10,A11,A12……….A99
CollectorproOnline has robust object ID Assignment capabilities. When you create or edit a workfile you can choose the object ID assignment method.
Manual
This method gives you complete control over the object ID. When selected, the Object ID field becomes an alphanumeric field, and you can enter values as needed
Examples include:
01,02,03,04,……..
A10,A11,A12……….
CollectorproOnline sorts the objects on the report by the value in the Object ID field, therefore you have complete control over the report object order.
Automatic
The automatic ID assignment will assign sequential numeric ID’s to each object as you add it.
This option is where CollectorproOnline assigns the object numbers (this is the default). In the situation, when you add objects, CollectorproOnline will number them sequentially starting with 1 and incrementing by 1 each new object added.
When you run a report, or click the Sort and Renumber button, CollectorproOnline will automatically resort the objects by Groupings assigned (chapter, category and subcategory if used) and renumber them starting with 1 and incrementing by 1. The benefit of this is that you do not have to worry with the object numbering. You can enter objects in any order you wish, and they are resorted by category and grouped by category and renumbered.
This is very useful in this example:
You enter 10 objects in the Category Furniture – Object ID’s are assigned as 1 – 10
You enter 5 objects in the Category Decorative Accessories – Object ID’s are assigned as 11 – 15
You find another object in the Furniture Category and enter it – Object ID assigned is 16
When you run the report, or click the Sort and Renumber button on the Object List screen, the Objects will be sorted by Category alphabetically and ID’s assigned sequentially starting with 1.
The results are:
Objects 1 – 11 are in the Category Furniture
Objects 12 – 16 are in the Category Furniture
In addition, if you enter 100 objects and then go back and delete a few, CollectorproOnline will automatically resort and assign ID’s when you run the report. No more worrying about missing ID’s or gaps in the ID sequences.
The implications of this are that an object ID can change, but in our design, we understood that the object ID itself was not as important as that the object ID’s are sequential with no gaps and that all objects in the same Groupings are listed together on the report. Based on this, we designed Collectorpro to handle all this for you automatically and save time.
Summary
For additional clarity or advice please contact us.
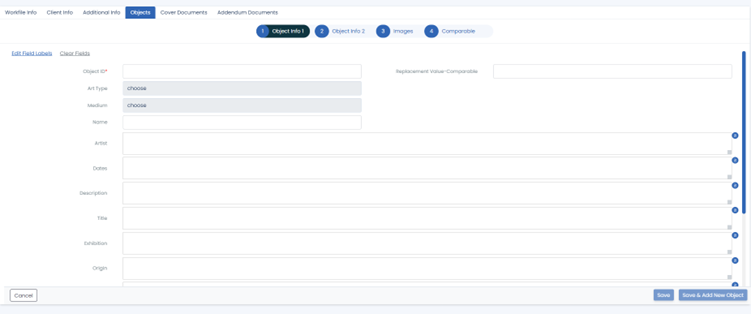
Object Info 1 Screen Overview
The Object Info 1 screen is the initial screen that appears after you click the “Add Object button. This is the first screen where you enter data regarding an individual object. The Object Info screen is where the field label template you assigned to this workfile will appear.
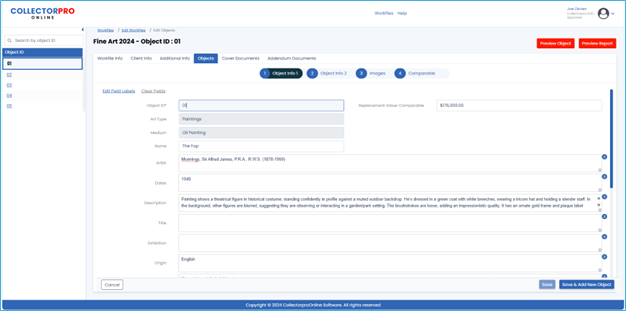
Object Info 1 Screen Details
The Object Info 1 screen is the initial screen that appears after you click the “Add Object button. This is the first screen where you enter data regarding an individual object. The
Left Navigation Pane – Object Listing – This is where you can see all the objects in the open workfile. This pane allows you to quickly move to a specific object. You can quickly navigate to any object by either:
- Using the scroll bar to the right to move up and down the list, find the Object you are looking for. Then click directly on the Object ID (in blue) in the list. This will open up the selected object.
- Using the search feature – type the Object ID into the search bar. It will bring up the object (s) that match your search criteria. Click on object ID (in blue) you choose. It will open up the selected object.
You can collapse to this listing to make the typing area larger for inputting data. To minimize this pane, click on the left pointing arrow in the upper right corner. To open the pane again, click on the right pointing arrow in the upper right corner.
Workfiles Shortcut – The “Workfiles” appears at the top of the page in the grey frame and is a quick way to return to the Workfile Listing Screen.
Edit Workfiles Shortcut – The “Edit Workfiles” Shortcut appears at the top of the page in the grey frame and is a quick wat to return to the Object Listing Screen.
Workfile Identification – The workfile ID is displayed prominently at the top of the page, just below the workfiles shortcut. It appears in bold, black letter to ensure clear visibility. This identifier serves as a quick reference, allowing you to easily confirm which file you are working in.
Preview Object Button – Red button that says, “Preview Object”. Click on this button to view/print a single object.
Preview Report Button – Red button that says, “Preview Report”. Click on this button to view/create report.
Object Navigation Ribbon – A quick navigational ribbon that allows you to quickly navigate to any of the four screens used for Object data entry. The default location is 1- Object Info 1, followed from left to right by 2 – Object Info 2, 3 – Images, and 4 – Comparable. The active screen will have the header tab in this ribbon filled fill a black background that will act as a visual indicator of what screen is currently active. To move to the next or additional screen, simply click on the desired tab.
Edit Field Labels – For all Field Label Templates the Flex Fields 1-4 (last four field labels) can be customized. Click on this link to assign titles to any or all of the flex fields. (See section on Customize Field Labels for instructions).
Clear Fields Shortcut – This serves as a quick way to clear all the information contained within the fields.
Chapter, Category and Subcategory – These are the next 3 fields that will appear if you have selected to use them. If you have not selected to use one or more of these fields, the will not appear on the screen.
Fields – Each field will have the field labels assigned to field label template that has been selected. Please see the field label template layouts in our client support portal for reference.
Valuation Field(s) – the final fields on this screen are the valuation fields. They will appear with the user defined valuation type assigned on the Workfile Info Screen. If none have been selected, nothing will appear. If more than one is being used, they will all appear in numeric order starting the with Primary Valuation Type.
Cancel – Click this button to cancel all information entered and return to the Object Listing Screen.
Save – Click this button to save all information entered and return to the Object Listing Screen.
Save & Add New Object – Click this button to save all information entered and open and new object.
Chapter, Category and Subcategory – These are the next 3 fields that will appear if you have selected to use them. If you have not selected to use one or more of these fields, they will not appear on the screen.
Fields – Will have the headings assigned to field label template that has been selected. Please see the field label template layouts in our client support portal for reference.
Valuation Field(s) – the final fields on this screen are the valuation fields. They will appear with the user defined valuation type assigned on the Workfile Info Screen. If none have been selected, nothing will appear. If more that one is being used, they will all appear in numeric order starting the with Primary Valuation Type.
Cancel – Click this button to cancel all information entered and return to the Object Listing Screen.
Save – Click this button to save all information entered and return to the Object Listing Screen.
Save & Add New Object – Click this button to save all information entered and open and new object.
Object Info 2 Screen Overview
The Object Info 2 screen is a screen where you enter all additional information regarding an individual object. It is where the Flex Fields, the four customizable fields available on any template, are located. The functionalities of the Object list, Workfiles Shortcut, Edit Workfile Shortcut, Workfile Identification, Preview Report Button, Object Navigation Ribbon, Edit Field Labels, and Clear Fields Shortcut remain the same (refer to previous sections for details).
Object Info 2 Screen Details
Fields – Will have the headings assigned to field label template that has been selected. Please see the field label template layouts in our client support portal for reference.
User Assigned – This field is used by any authorized user to assign specific object to a specific user. The default assignment is to the user that created the workfile.
Notes – This is an unlimited text field that can be used for additional information you want to save in reference to an object. It is for internal use only and does not print on the report.
Flex Fields – These are the additional fields you have in every workfile whose titles can be defined by the user. Note: The titles assigned are used for the entire workfile and not to a specific object
Cancel – Click this button to cancel all information entered and return to the Object Listing Screen.
Save – Click this button to save all information entered and return to the Object Listing Screen.
Save & Add New Object – Click this button to save all information entered and open and new object.
Images Screen Overview
The Images Screen allows you to add up to six (6) images for each individual object. Each image box corresponds to a specific position in the report, as shown in the image below.
The functionalities for the Object List, Workfiles Shortcut, Edit Workfile Shortcut, Workfile Identification, Preview Object, Preview Report Button, Object Navigation Ribbon, Edit Field Labels, and Clear Fields Shortcut remain unchanged. For details, refer to the Object Info 1 screen.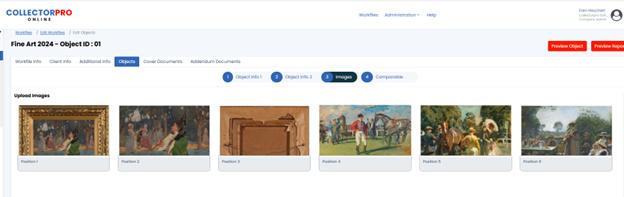
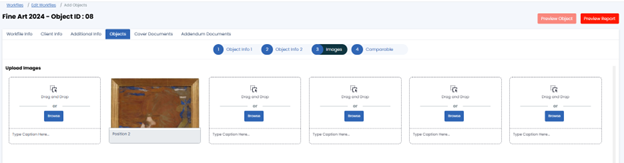
Images Screen Details
The following are important notes about the Images Screen.
- You can add up six images per object.
- Each image must be 5MB or smaller.
- Use the Browse button or drag and drop an image into the desired position.
- Optionally, add a caption for each image. Captions appear below the images in the report.
- After uploading an image, verify it by clicking the green checkbox in the upper-right corner of the image boxt. This step ensures the image is added to the workfile.
- To delete an image, hover over it and click the trash can icon.
- The image placed in the lowest numbered position will serve as the thumbnail image on the Object Listing Screen.
- Clicking the four-way arrow in the center of a saved image will pop out the image to view in its entirety.
Cancel – Click this button to cancel all information entered and return to the Object Listing Screen.
Save – Click this button to save all information entered and return to the Object Listing Screen.
Save & Add New Object – Click this button to save all information entered and open and new object.
Images Best Practices
Only JPEG and PNG image formats are supported.
IMPORTANT – iPhone and iPad HEIC along with HEIF format images are NOT supported. If you use one of these devices to take object and comparable images, be sure to set your camera settings to Compatible format before taking the images.
Images look best in the report if they are all the same, or near the same dimensions (W X H).
Maximum Image upload size is 2.5mb maximum. Consider taking the images using camera settings that will accommodate this size or resize the images before attaching to objects and comparables.
Portrait and Landscape image orientation is supported. CollectorproOnline will do it’s best to center the images on the report in the image’s respective position in the report.
How to add images (Image Positions on report)
As previously mentioned, each Object Image Details Screen contains six (6) boxes for images. Each box corresponds to a specific position in the final report layout. They layout is as follows from left to right:
- Box 1 – Position top row – left
- Box 2 – Position top row – center
- Box 3 – Position top row – right
- Box 4 – Position bottom row – left
- Box 5 – Position bottom row – center
- Box 6 – Position bottom row – right
The image below illustrates how the six (6) images from the Image Screen Overview correspond to their positions in the final report.

This structured layout ensures your images appear in the desired locations in the report. For example, if you want only 1 image to be in the center add the image to box 2 and leave all other image boxes empty. See example below.

Comparable Screen Overview
This screen is where you add or view the listing of comparables for each object. When you first click this screen will be empty. You will need to click on the blue Add Comparable button on the right to add a comparable.
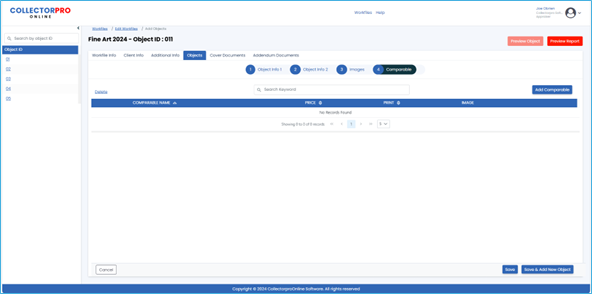
Comparable Screen Details
To add a comparable:
From any tab in the Object Detail Screen, Click on the 4 Comparable tab.

This tab will take you to the Comparable Listing Screen.
To add a new comparable, click on the blue “Add Comparable” button.
A pop-out window will appear.
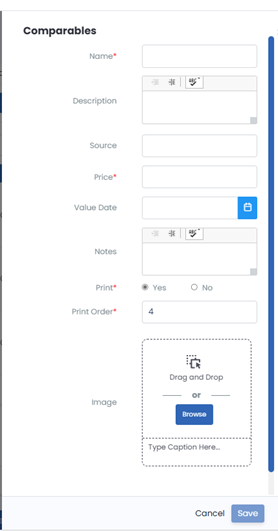
Fill in data fields. Note: Fields marked with a red “*” are required fields and must be completed in order to save the comparable. $0.00 is a valid price.
Once all required fields have been completed, the “Save” button will become active.
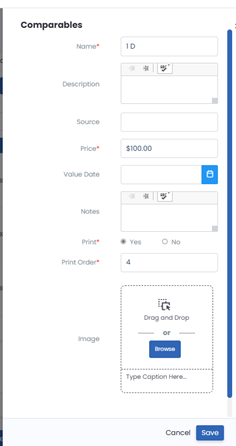
Click on the blue “Save” button.
After saving, you will be redirected to the Comparable Listing Screen.
Follow the steps above to add more comparables.
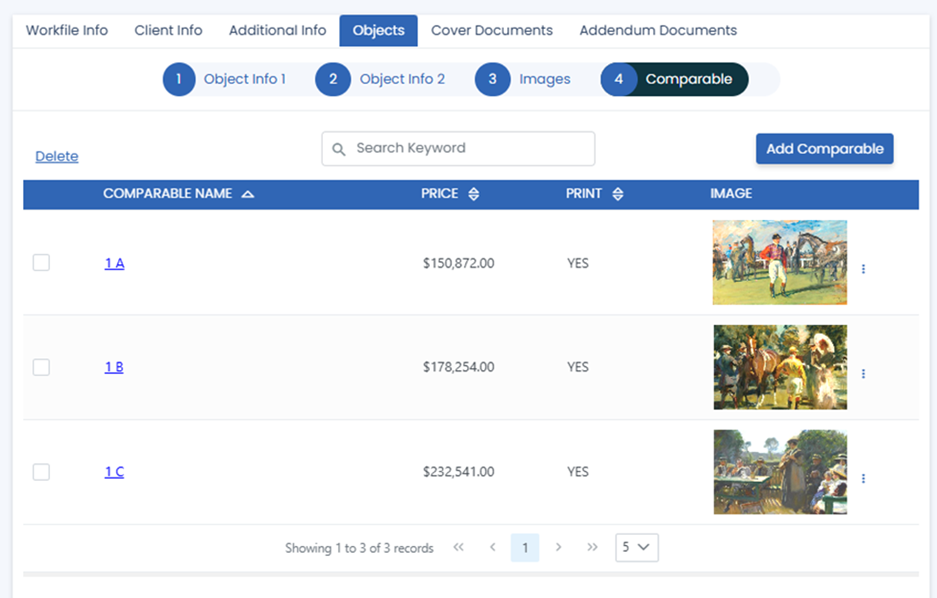
Additional Information:
Printing Comparables on the Report
- You can choose whether a comparable will appear in the final report by selecting Yes or No using the radio button.
- If you choose No, the comparable will be stored digitally in the workfile but will not print on the report.
Unlimited Comparables
- There is no limit to the number of comparables you can add to an object, giving you flexibility to include as many as needed.
Cover and Appendix Documents
Cover and Appendix Documents Overview
page, cover or transmittal letter, certification, and other introductory materials. Appendix documents appear at the end of the report and may include materials such as a professional profile, glossary, or other supporting information.
In CollectorproOnline, you can draft or copy and paste both cover and Appendix documents directly into the platform. The system offers flexibility, allowing you to add unlimited cover and appendix documents, rearrange their order within the report, and apply rich text formatting as needed. This ensures that all documents are compiled in their appropriate positions, resulting in a complete, organized, and professional report.
Cover Document Details
Adding a Title Page:
Click the Cover Documents tab, where you’ll see an entry for the Title Page.
To include a title page, click the red “Pencil” button on the right.

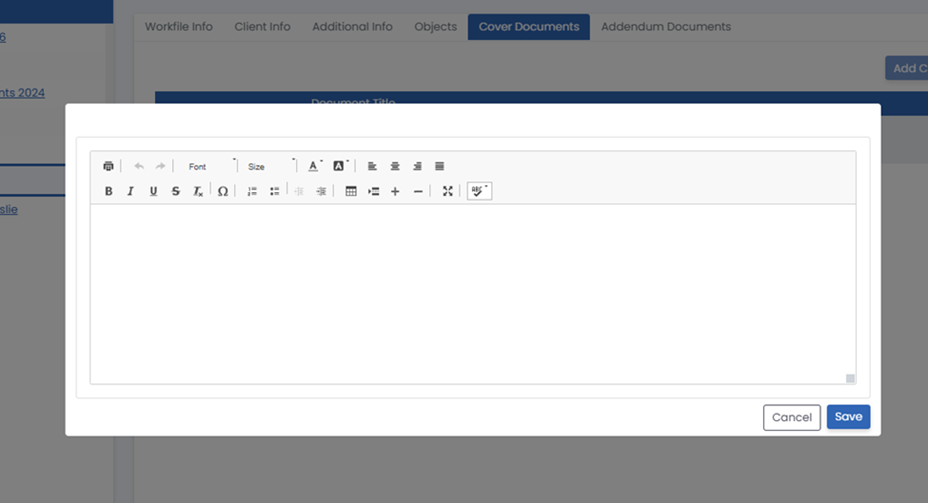
This will open the editor menu. Click on the red “Paper” button on the right to launch the editor.

This will open up a pop-out window for the Document Editor
You can either type directly into the editor or copy and paste from an existing document (e.g., Word). Note: Use the CTRL+V command to paste into the editor.
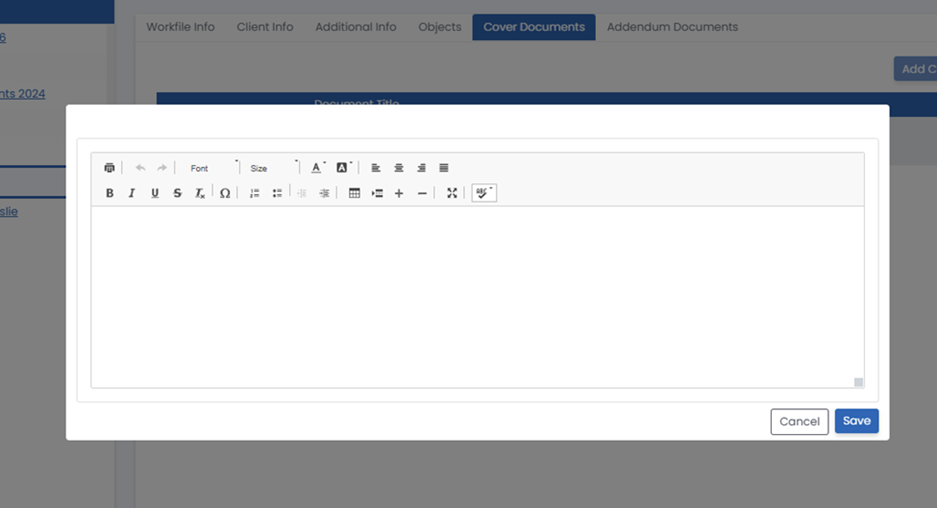
Once you’ve finished adding your content, click the blue “Save” button at the bottom of the screen.
Note: The Title Page will always be the first document in your report. You cannot move or delete this document position. If you do not want a title page, simply ignore the Title Page position and begin with a new document.
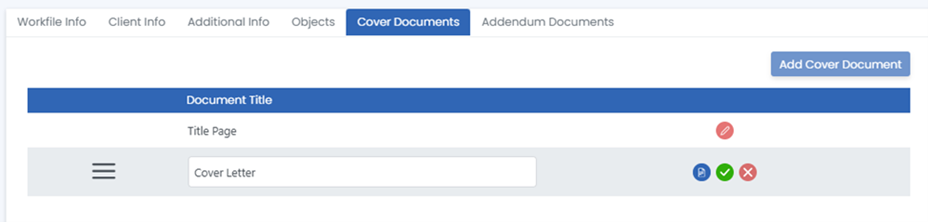
To add a cover document:
Locate and click the blue “Add Cover Document” button on the right-hand side.

A new document entry line will appear on the screen.
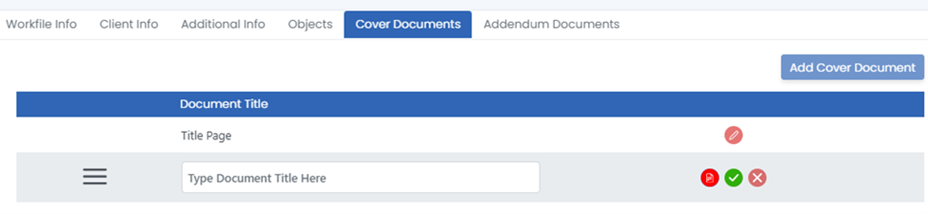
Add a title for the document. Note: This is a mandatory field, and it will populate the Table of Contents. If no title is added, the document cannot be saved.
Click the red “Paper” button on the right to open the document editor.
You can either type directly into the editor or copy and paste from an existing document (e.g., Word). Note: Use the CTRL+V shortcut to paste text into the editor.
Once you’ve finished editing, click the blue “Save” button at the bottom of the screen.
You will be automatically returned to the Cover Documents
Click the green “Checkmark” button to finalize and save the document.
- After saving, the “Add Cover Document” button will be reactivated, allowing you to add more cover documents as needed.
- Repeat the above steps to add additional documents.
Note: To reorder the documents, click and hold the three-bar anchor (located to the left of the document title) and drag it to the desired position.
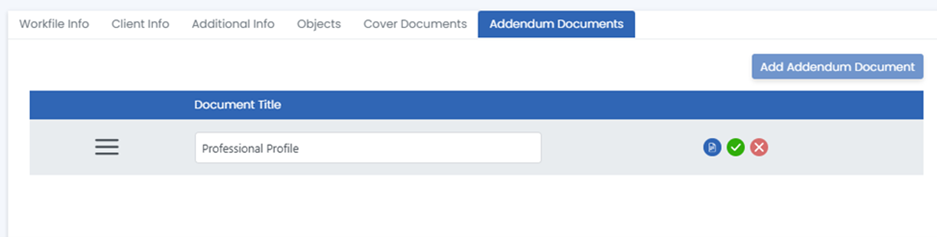
Appendix Documents Details
To add Appendix Documents:
Click on the “Appendix Documents”
Locate and click the blue “Add Appendix Document” button on the right-hand side.
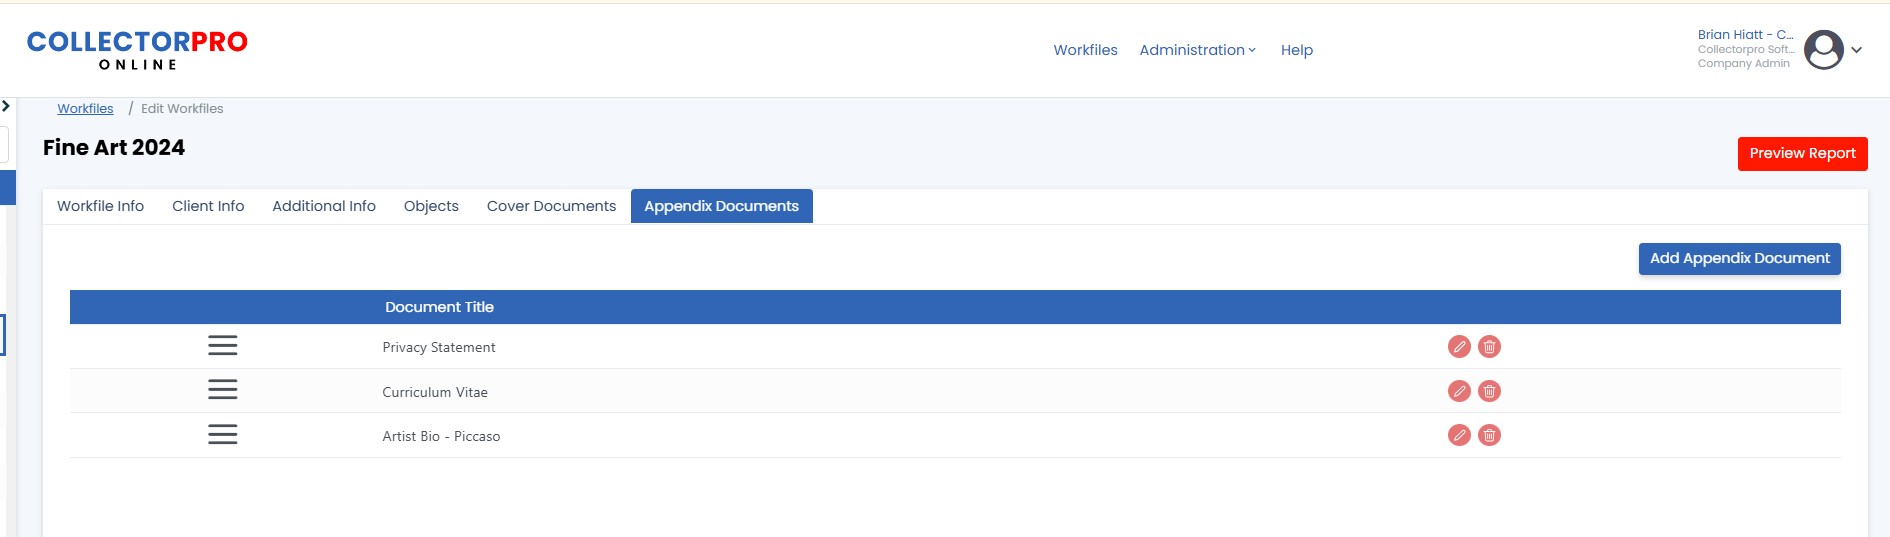 A new document entry line will appear on the screen.
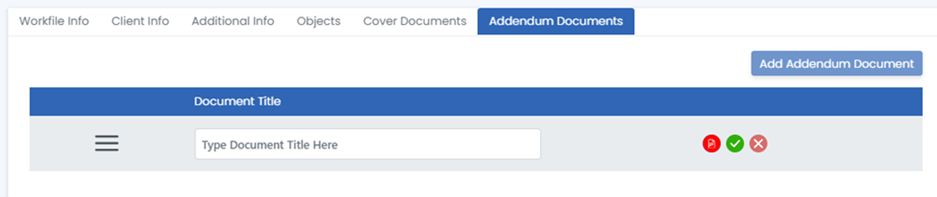
Add a title for the document. Note: This is a mandatory field, and it will populate the Table of Contents. If no title is added, the document cannot be saved.
Click the red “Paper” button on the right to open the document editor.
You can either type directly into the editor or copy and paste from an existing document (e.g., Word). Note: Use the CTRL+V shortcut to paste text into the editor.

Once you’ve finished editing, click the blue “Save” button at the bottom of the screen.
You will be automatically returned to the Appendix Documents screen.
Click the green “Checkmark” button to finalize and save the document.
After saving, the “Add AppendixDocument” button will be reactivated, allowing you to add more appendixdocuments as needed.
Repeat the above steps to add additional documents.
Note: To reorder the documents, click and hold the three-bar anchor (located to the left of the document title) and drag it to the desired position.
Basic Tips for using the Editor:
Toolbar Functions:
- The editor functions similarly to Word or Google Docs.
- Access tools via the toolbar at the top of the screen.
- Hover your cursor over an icon to see its function.
Key Features:
- Printer Icon: Preview your document.

- Arrow Icon: Toggle full-screen mode. Clicking it again will return the editor to its original size.

- Spellcheck Icon: Perform a spellcheck on the entire document.

Note: If you are trying to copy and paste from a different application, you must use CTRL+V or CMD+V to paste information into the editor.
Report Information
Report Details
CollectorproOnline will automatically format your report in a Microsoft Word document format. This makes for easy review and minor editing after report creation.
Important Note: Edits made to the Word document after downloaded are not placed back in CollectorproOnline.
Creating the Report:
Open the desired Workfile or locate the Workfile on the Workfile list screen
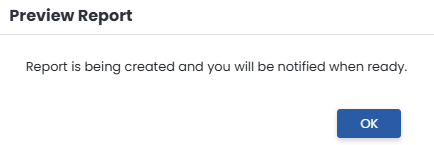
Click the Preview Report button and the message below will appear. Click Ok
When the report is ready the message below will appear. Click Download to download the report Word document or cancel to not download.

Once the Word document report is downloaded to your browser you can find it in your Downloads folder and click on it to open it.
Important Note: Depending on your security settings you may have to “Enable Editing” after downloading the Word document.
![]()
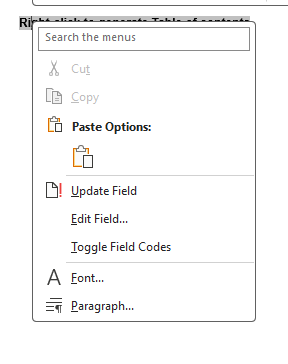
How to update the Table of Contents:
The report Word document will contain a Table of contents placeholder.
To populate the table of contents with the report section page numbers, you can right-click on the words “Right Click to generate table of contents” then click on “Update Field”.
Summary Totals Report Sections Overview
The Summary Totals can be a key part of your report. These sections provide a quick, organized snapshot of the objects in your report, broken down by the classifications you have chosen in the Groupings (Chapters, Categories, and Subcategories). This section displays the total number of objects and their corresponding values for each classification, helping you and your client easily understand how the collection is organized and valued.
Each Summary Total is automatically generated based on the Groupings you assign to the objects in your workfile. These totals give an overview of the objects, categorized by location (Chapters), room or object type (Categories), and more specific classifications (Subcategories).
The Summary Totals section appears at the beginning of he body of your report, giving a concise breakdown of the entire collection before you dive into the detailed object listings.
Note: If you choose not to use Groupings, the Summary Totals section will be omitted from the report.
How to View and Use Summary Totals
The Summary Totals section is compiled automatically from the classifications you’ve entered for your objects. Here’s how it works:
- When creating your report, the Summary Totals section will appear at the beginning, summarizing the Chapter, Category, and Subcategory information.
- Each Summary Total will display the name of the Chapter/Category/Subcategory, the number of objects in that classification, and the total value for those objects.
- These totals provide a snapshot of your entire workfile, allowing you to easily see how the objects are organized and valued based on the classifications you’ve applied.
If you’ve chosen to use all three levels of Groupings (Chapters, Categories, and Subcategories), you will see three separate Summary Totals sections in the report.
Summary Total Examples
Example 1
You are doing an appraisal with multiple houses you can use the Groupings like this:
Chapter – Jackson Hole, Miami, NYC
Category – Living Room, Dining Room, Bedroom 1, etc.
Subcategory – Fine Art, Furniture, Rugs, Decorative Accessories
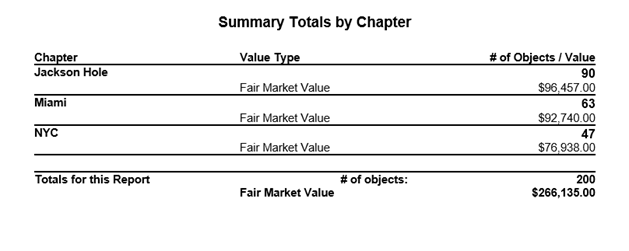
In this example you will get three summary totals report sections. See examples below.
Summary Totals by Chapter

Summary Totals by Category
Summary Totals by Subcategory

Importing and Exporting Objects
Importing and Exporting Objects Overview
The Importing and Exporting features in CollectorproOnline allow users to efficiently manage object data. These tools enable the transfer of information to and from the platform, making it easier to handle large datasets, share data in standardized formats, and collaborate with colleagues or clients. Importing objects allows users to quickly upload multiple records at once, while exporting provides a convenient way to save, back up, or share data as needed.
Note: You will need to use the same Object Import Template for the Field Label you have selected for the workfile. All the Object import Template are available in the Client Support Portal.
Importing Objects Details
Create a new workfile (or open and existing workfile)
Navigate to the Objects tab
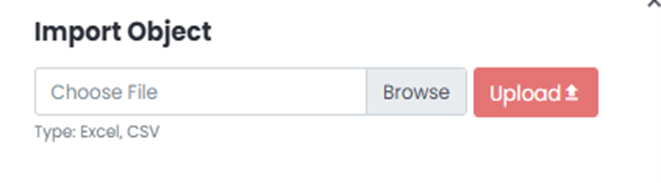
Click on the blue “Import Objects” button on the right – a pop out window will appear

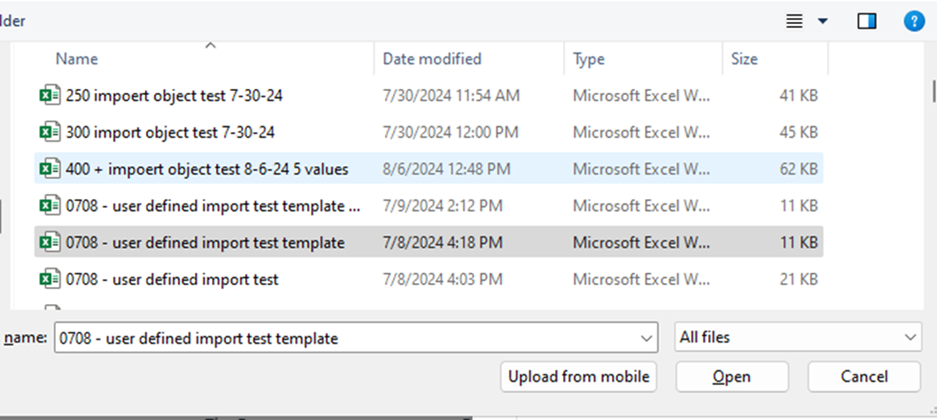
In the pop out window, click the gray “Broswe” button. This will open up a file explorer.
In the File Explorer window, navigate to your spreadsheet and click “Open on the bottom right.
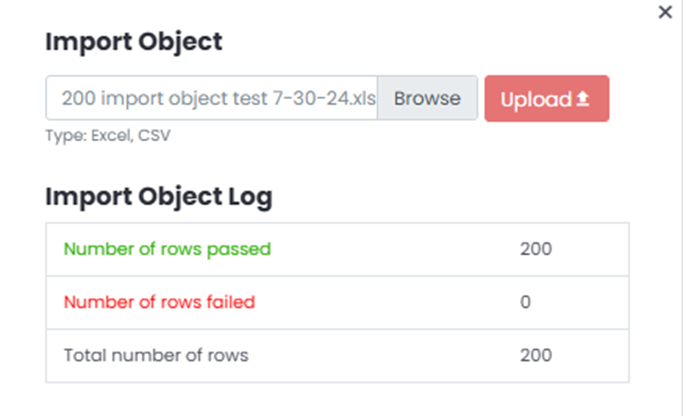
CollectorproOnline will run a validation check on the spreadsheet data. The results will appear in the Import Object Log, where you can verify the data. If any rows fail validation (e.g., due to a duplicate object number), the reasons for failure will be listed below the log.
Once the data has been verified, click on the red “Upload” button on the right.
CollectorproOnline will add the objects to the workfile and redirect you to the Object Listing screen once the import is complete.
Exporting Objects Details
To Export objects from a workfile to Excel:
Navigate to the Workfile Listing screen
Locate the workfile you wish to export
Click on the three dot (kabob) menu at the end of the row
A drop-down menu will appear. Click on “Export Objects”

All objects from the workfile will be exported, and a download link will appear in your browser’s Downloads
Click the download link to save the file, then open it in Excel to view and edit the exported data.
Need Help Now?
Need Help right now? Please call us at 972-908-3964 or use the form below. Thank you!